

Hey there, fellow food lovers! Today, I’m super excited to share with you a fun and easy recipe that’s perfect for a quick snack or even as part of your next packed lunch—Onigiri, or Japanese Rice Balls! These adorable little triangles of joy are not only delicious but also a breeze to make. Plus, they’re packed with flavor and can be customized to your liking. Whether you’re a fan of Asian food snacks or just looking for a new idea for quick family dinners, this recipe is a must-try. Let’s dive in and learn how to make Onigiri like a pro!
Why You’ll Love This Recipe
- Perfect for quick family dinners or easy snacks
- Customizable with your favorite fillings or seasonings
- A fun and aesthetic cute food idea for any meal
- Ready in just 30 minutes—great for weeknight dinner ideas
- Healthy and easy to make with simple ingredients
Ingredients
Here’s what you’ll need to make these delicious Onigiri:
- 3 cups cooked rice (short-grain rice works best)
- 2 tablespoons furikake (or more to taste)
- Water (for wetting your hands)
- Kosher salt (for seasoning)
- 2 sheets roasted nori (cut into small strips)
- Sesame seeds (optional, for extra flavor and aesthetics)
Full ingredient list with measurements is provided in the printable recipe card below.
How to Make the Recipe
Let’s get started! Here’s a step-by-step guide to making Onigiri:
- Prepare the Rice: Place the cooked rice into a mixing bowl and sprinkle on the furikake. Mix well to combine. You can adjust the amount of furikake to your taste—this is your chance to get creative!
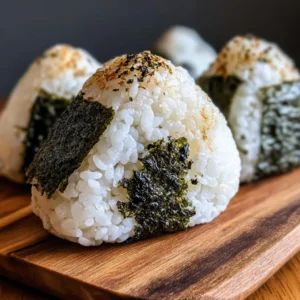
- Shape the Onigiri: Wet your hands with a little water and sprinkle some kosher salt onto them. This helps prevent the rice from sticking to your hands and adds a touch of flavor. Scoop about 1/2 cup of the rice mixture and shape it into a triangle using your hands. Don’t press too hard—just enough to form the shape. If you’re feeling extra crafty, you can use Onigiri molds to get that perfect triangle shape.
- Add the Nori and Sesame Seeds: Place a strip of nori on the bottom of each rice ball and sprinkle some sesame seeds on top if you’re feeling fancy. Repeat until all the rice is used up.
- Serve and Enjoy: These are best enjoyed immediately, but you can also wrap them individually in plastic wrap and store them for later. They’re perfect for lunchboxes or as a quick snack on the go!
Pro Tips for Making the Recipe
Here are a few tips to help you make the best Onigiri ever:
- Use the Right Rice: Short-grain rice is essential for Onigiri. It’s stickier and holds together better than regular rice.
- Don’t Overmix: Mix the rice and furikake just until combined. Overmixing can make the rice too dense.
- Experiment with Fillings: While this recipe doesn’t include fillings, you can add everything from tuna salad to pickled plum (umeboshi) in the center for extra flavor.
- Keep It Fresh: Onigiri is best eaten fresh, but you can make them in the morning and store them in an airtight container for up to a day.
How to Serve
Onigiri is incredibly versatile and can be served in so many ways. Here are a few ideas:
- As a Snack: Enjoy them on their own or paired with a piece of fruit for a quick and easy snack.
- In a Lunchbox: Add them to your lunchbox along with some edamame, miso soup, and a few slices of fresh cucumber for a complete meal.
- With Soup: Serve them on the side of a warm bowl of soup for a comforting meal.
- As a Side Dish: They’re a great addition to any Asian-inspired meal or even as a side for your favorite Tanghulu dessert!
Make Ahead and Storage
Onigiri is best made fresh, but you can prepare them in the morning and store them in an airtight container or wrapped individually in plastic wrap. They’ll keep for up to a day, making them a great option for meal prep. If you’re planning to eat them later, you can also store them in the fridge for a few hours before serving.
And there you have it—a simple and delicious recipe for Onigiri that’s perfect for any occasion. Whether you’re looking for a quick snack, a fun lunch idea, or even a creative addition to your next dinner party, these Japanese Rice Balls are sure to hit the spot. Don’t forget to check out some of our other easy recipes, like Banana Protein Balls and High-Protein Chocolate Chia Seed Pudding, for more quick and tasty meal ideas. Happy cooking, and I hope you enjoy making these Onigiri as much as I do! 🍚✨
Onigiri Japanese Rice Balls
Ingredients
Ingredients
- 3 cups cooked rice freshly cooked and cooled just slightly*
- 2 tablespoons furikake + more if desired
- water just to wet your hands
- kosher salt to sprinkle on your hands
- 2 sheets roasted nori cut into small strips
- sesame seeds
Instructions
- Place the cooked rice into a mixing bowl and sprinkle on the furikake. Mix together.
- Wet your hands with water and sprinkle kosher salt on them. Scoop about 1/2 cup of rice and shape into triangles.
- Place one piece of nori on the bottom of each rice ball and sprinkle with sesame seeds if desired.
- Repeat until all rice is used. Serve immediately or wrap individually with plastic wrap.