

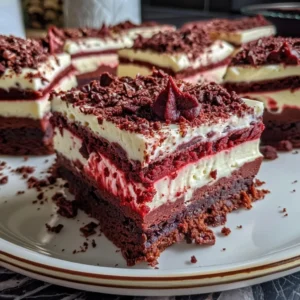
Oh, my goodness! If you’re looking for a dessert that’s not just delicious but also a showstopper, you’ve come to the right place! Today, I’m excited to share my recipe for Red Velvet Cheesecake Brownies. These luscious treats are the perfect blend of rich chocolatey goodness and creamy cheesecake, making them an irresistible choice for any occasion. Whether you’re planning a family gathering, a holiday celebration, or just a cozy night in, these brownies will surely impress. Plus, they’re so easy to make that you’ll want to whip them up again and again!
Why You’ll Love This Recipe
- Decadent flavor that combines the best of both worlds: brownies and cheesecake!
- Perfect for any occasion, from casual get-togethers to fancy dinner parties.
- Easy to follow steps, making it a great choice for both novice and experienced bakers.
- Can be made ahead of time, so you can enjoy your time with family and friends.
- Great for satisfying your sweet tooth or impressing guests with a stunning dessert.
Ingredients
Let’s gather our ingredients! Here’s what you’ll need to create these delightful Red Velvet Cheesecake Brownies:
- For the Red Velvet Brownies:
- 1/2 cup unsalted butter, melted
- 1 cup granulated sugar
- 2 large eggs
- 1 teaspoon vanilla extract
- 1 tablespoon red food coloring
- 1 tablespoon cocoa powder
- 3/4 cup all-purpose flour
- 1/4 teaspoon salt
- For the Cheesecake Layer:
- 8 oz cream cheese, softened
- 1/4 cup granulated sugar
- 1 large egg
- 1/2 teaspoon vanilla extract
Full ingredient list with measurements is provided in the printable recipe card below.
How to Make the Recipe
Now, let’s dive into the fun part—making these brownies!
- Preheat the Oven: Preheat your oven to 350°F (175°C) and line an 8×8-inch baking pan with parchment paper, leaving some overhang for easy removal.
- Prepare the Red Velvet Brownie Batter: In a large mixing bowl, whisk together the melted butter and sugar until smooth. Add the eggs, vanilla extract, and red food coloring, stirring until well combined. Sift in the cocoa powder, flour, and salt, gently folding until just combined. Be careful not to overmix!
- Make the Cheesecake Layer: In a separate bowl, beat the softened cream cheese and sugar together until smooth. Add the egg and vanilla extract, mixing until creamy and free of lumps.
- Assemble the Brownies: Pour about 3/4 of the red velvet brownie batter into the prepared baking pan, spreading it evenly. Carefully pour the cheesecake layer over the brownie batter, spreading it gently to the edges. Drop spoonfuls of the remaining red velvet batter on top and use a knife or toothpick to swirl it for a marbled effect.
- Bake: Bake for 30-35 minutes, or until the center is set and a toothpick inserted comes out mostly clean (a few moist crumbs are okay!).
- Cool: Let the brownies cool completely in the pan on a wire rack before removing them.
- Serve: Slice the brownies into squares and enjoy!
Pro Tips for Making the Recipe
Here are some of my favorite tips to ensure your Red Velvet Cheesecake Brownies turn out perfectly:
- Make sure your cream cheese is softened to room temperature for a smooth cheesecake layer.
- Don’t skip the swirling step! It not only looks beautiful but also enhances the flavor.
- For a festive touch, consider adding white chocolate chips or crushed nuts to the brownie batter.
- These brownies are perfect for holiday desserts chocolate or as sweets for a party!
How to Serve
These brownies are delightful on their own, but you can elevate them even further! Here are some serving suggestions:
- Serve warm with a dollop of whipped cream or a drizzle of chocolate sauce for extra indulgence.
- Pair them with a scoop of vanilla ice cream for a delicious contrast of temperatures.
- For a romantic touch, serve as dessert ideas for two with a glass of red wine.
Make Ahead and Storage
These brownies can be made ahead of time, making them perfect for busy schedules. Here’s how to store them:
- Once cooled, store the brownies in an airtight container at room temperature for up to 3 days.
- For longer storage, refrigerate them for up to a week or freeze for up to 3 months. Just make sure to wrap them tightly!
- When ready to enjoy, simply thaw at room temperature or warm them slightly in the microwave.
So there you have it! A delightful recipe for Red Velvet Cheesecake Brownies that’s sure to become a favorite in your home. Whether you’re looking for Red Velvet Baking Ideas or just a sweet treat to brighten your day, these brownies are the answer. Happy baking!
Red Velvet Cheesecake Brownies Recipe
Ingredients
For the Red Velvet Brownies:
- ½ cup unsalted butter, melted
- 1 cup granulated sugar
- 2 large eggs
- 1 teaspoon vanilla extract
- 1 tablespoon red food coloring
- 1 tablespoon cocoa powder
- ¾ cup all-purpose flour
- ¼ teaspoon salt
For the Cheesecake Layer:
- 8 oz cream cheese, softened
- ¼ cup granulated sugar
- 1 large egg
- ½ teaspoon vanilla extract
Instructions
- Preheat the oven to 350°F (175°C) and line an 8x8-inch baking pan with parchment paper.
- Mix melted butter and sugar until smooth. Add eggs, vanilla, and red food coloring; mix well. Sift in cocoa, flour, and salt; fold until combined.
- Pour about 3/4 of the brownie batter into the prepared pan, spreading evenly.
- Beat cream cheese, sugar, egg, and vanilla until smooth. Drop spoonfuls over the brownie layer and swirl gently. Top with remaining brownie batter.
- Bake for 30-35 minutes until the center is set. Cool before slicing and serving.